I warned in my review that Sacred 3 would be contentious among gamers. It may be one of the year’s most disappointing releases if consumers decide to check it out solely based on the title. No, this is not a Sacred game by any conventional definition. Exploration enthusiasts may be disappointed to learn that the loot shower and open world were both removed in the third numbered entry. Once I accepted the game for what it is and stopped expecting it to be something else, I started having a great time with it. Here are some pointers to help you have a better time adventuring in the game if that’s what you’re planning to do.
- Quaker Oats Bring Your Best Bowl ” Contest, Lucas Knipp L Creative & Art Direction
- The 12 Best Coffee Shops In Charlotte Nc, The 7 Best Coffee Shops In Charlotte
- Top 10 Best Imax In Boston Movie Theaters, Amc Boston Common 19
- Watch Chrisley Knows Best Hawaii, Unavailable In Your Region
- The 15 Best Steakhouse In Riverside Ca With Reviews, The 5 Best Steakhouses In Riverside
While playing Sacred 3, I interacted with all four playable characters, but my heart belonged to Claire, the Seraphim paladin. While I didn’t particularly care for the Seraphim in Sacred 2, I found that she struck a good balance between mobility and damage output in this game. Nonetheless, whether you’re going it alone or have a party of four, any of the classes can do the job. Listed below is a brief explanation of each option:
Bạn đang xem: Our Sacred 3 Best Class – :: Sacred 3 General Discussions
Alithea is a lancer in the Ancarian army and she specializes in the use of polearms. Because of her weapon of choice, she is able to deal significant damage to her foes from a safe distance, without having to worry about being burned by their hot breath. Each character has both standard attacks and special skills known as combat arts. As long as her energy lasts, Alithea can unleash a devastating flurry of attacks using her earthquake combat art. Claire, the Seraphin paladin we just mentioned, is armed. Because of her agility, Claire is able to quickly engage her enemies, sever them into ribbons, and move on to the next target (or escape if they are still alive). Lightning-based martial arts, of which she has a nice selection, are another of her strengths. She taught me tempest combat and chain lightning, and I never looked back. As a Khukuri archer, Vajra can use arrows to pin down her foes. The cold is the primary focus of his combat arts, allowing him to freeze and slow his opponents and buy himself time to reposition if they get too close. His initial attack, a piercing shot, can penetrate an opponent’s shield. Marak, a Safiri warrior, leaves his mark on the world with solar attacks (and a big mallet). His slow-moving weapon deals out damage but he can take a lot of it. Among the four heroes, he is the easiest to understand, and is the best choice for players who just want to charge at anything that moves and kill it.
The tutorial mission does an acceptable job of teaching the fundamentals of combat, but there are a few points that shouldn’t be glossed over. When you first start out, the bash move is essential. Use the charged version to disable traps from a distance and the uncharged version to temporarily stun shielded brutes. Enemies using magic will be a major nuisance until you learn to interrupt their spells with a well-placed bash. Adopt this practice from the get-go, and you’ll have no trouble at all countering the bad guy’s icon whenever you see one.
Xem thêm : Blade & Soul: Blade And Soul Best Solo PVE Class, Blade And Soul Best Solo Class 2021
There is also a roll button that you will find yourself using frequently. Because it looks so ridiculous, it may become your preferred mode of transportation, as it has for me. As an added bonus, it’s practical. This should be your go-to maneuver when things get intense because it allows you to quickly and easily navigate around obstacles in the environment. You may need to strengthen your weapons before you can reliably kill a brute with a single blow. Roll out of the way and get ready to bash them again when they get back up on their feet. Alternately, after finishing off an opponent, you can use the roll to quickly advance to a new attacking position. (More details on that on the following page.)
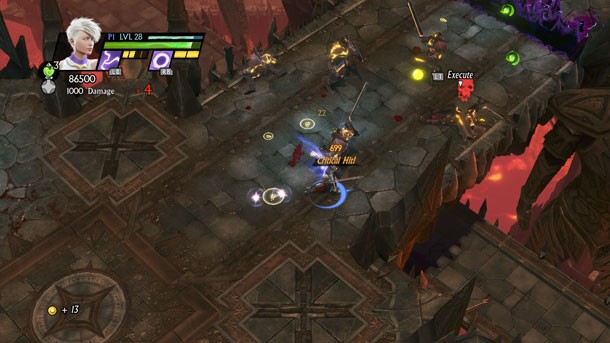
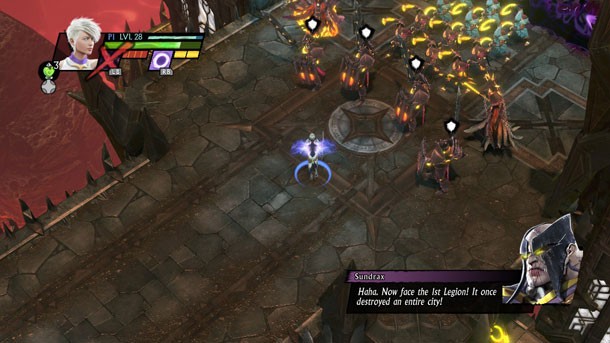
Don’t give your defeated foes the satisfaction of one last poke by rolling over on top of them. They’re already dead, in which case you’re wasting your time, or the indicator for the execute maneuver hasn’t appeared. Without a doubt, the single most crucial aspect of winning the game is that execute move. When an enemy is marked with it, you can press a single button to have your character leap into the air (for a pretty ridiculous distance) and deal a fatal blow. Executing multiple enemies in quick succession fills a meter that not only allows you to deal more damage, but also increases the chance that your enemies will drop more gold and healing items when they die.
The characters’ willingness to travel absurd distances to carry out executions is fascinating, and I can’t fault their enthusiasm. Use what is essentially teleportation to your advantage. It’s a fantastic way to plunge headfirst into a group of foes, and it’s just as useful for dispatching a far-off opponent so that you can escape danger.
At times, you will be able to use a power move on the game’s larger foes. Take it. When you press the corresponding button, a button-mashing sequence begins, and the bad guy is temporarily stunned for as long as you keep mashing the button. Here is where your co-players can join in and give you a hand while you beat the jerk senseless. It doesn’t matter if you’re playing by yourself or with a partner; always bring the heat. They slowly chip away at health, and enemies around you (even at range) will wait until they’re done before attacking again. There is no drawback to using power moves whenever they are available, unless you are standing on a trap or something else that does area-of-effect damage.
Xem thêm : Best Coast Band Shirt – Best Coast Store: Official Merch & Vinyl
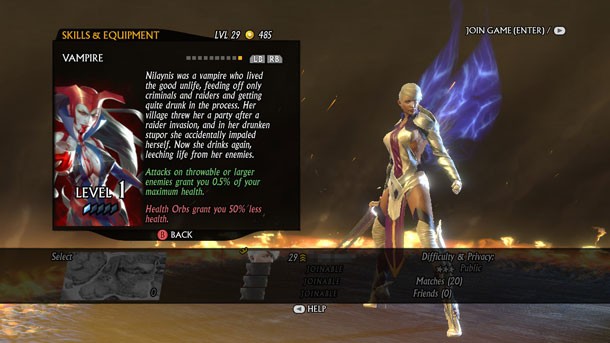
While the loot may be gone, you can still find battle shards as you complete missions in the Ancaria region. These offer a range of benefits (that are offset by costs), but whether or not you use them effectively is entirely dependent on your play style. The following three are the ones I found to be most useful.
In other words: Xem thêm:Builders in Las Vegas, NV, Who You Can Trust The Top 14 Las Vegas, NV Home Builders
When you use the Demoness, your attacks will set your foes on fire, but you will take extra damage in return. However, by the time I had gotten her, my armor was high enough level that the drawback no longer mattered. The Gladiator is a good choice for new players because it boosts your damage when your health is low. It’s a nice safety net to have, but you shouldn’t count on it too often unless you’re regularly bashing and executing fools like a maniac. My personal favorite is the vampire. In exchange for reducing the amount of health restored by healing items, she converts a portion of the damage you deal into health. That’s beside the point. I was able to be even more aggressive after equipping the Vampire because the damage taken from larger foes was quickly cancelled out by the buff to my health. It’s in need of some repair, but I can’t really complain. She’s also a lot less grating than some of the other battle shards, many of which offer terrible audio commentary.
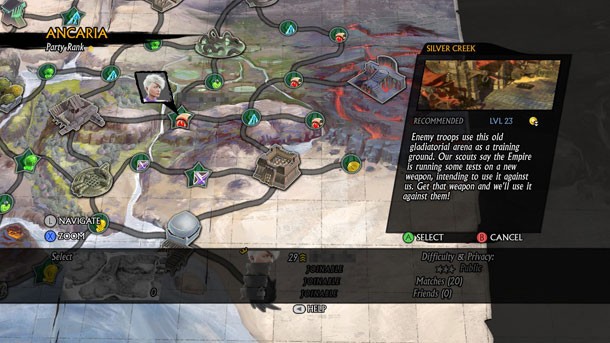
Sacred 3 lacks open worlds and an expansive sense of exploration. You can find hidden chests by venturing (very) slightly off the beaten path, but they are rarely worth the extra effort. They have a pitiful amount of gold and healing supplies. Complete the optional tasks instead. Specifically, the star-shaped one will reward you with the smart-bomb item, and the ones to the right and above it (indicated by red icons) will increase your inventory space. Smart bombs are useful, and despite your low level, you should have no trouble completing the missions that require you to use one. When you finally crack them, you should find a plethora of healing elixirs and other ways to prolong your life. You can always get more, so don’t be stingy with them if you have to.
Without giving too much away, the final boss will be a real pain to fight. Put up with his foolish behavior for now and deal with it when he comes to you. After you battle him, you’ll see what I mean.
Nguồn: https://directmarketingcenter.net
Danh mục: Best